阅读《Spring Cloud微服务实战》关于Spring CLoud Config所做的一些笔记
概述
Spring Cloud Config用于为分布式系统中的基础设施及微服务提供集中化的外部配置支持。分为两个部分,其中分布式配置中心作为服务端,而基础设施及微服务则作为客户端。配置信息的存储支持Git、SVN及本地化文件系统。
构建简单的服务端
创建maven工程,引入关键依赖如下:
	<parent>
		<groupId>org.springframework.boot</groupId>
		<artifactId>spring-boot-starter-parent</artifactId>
		<version>1.5.8.RELEASE</version>
		<relativePath/> <!-- lookup parent from repository -->
	</parent>
	<dependencies>
		<dependency>
			<groupId>org.springframework.cloud</groupId>
			<artifactId>spring-cloud-config-server</artifactId>
		</dependency>
  <dependencies>
	<dependencyManagement>
		<dependencies>
			<dependency>
				<groupId>org.springframework.cloud</groupId>
				<artifactId>spring-cloud-dependencies</artifactId>
				<version>${spring-cloud.version}</version>
				<type>pom</type>
				<scope>import</scope>
			</dependency>
		</dependencies>
	</dependencyManagement>
创建Spring Boot的应用主类并添加@EnableConfigServer注解
@EnableDiscoveryClient
@EnableConfigServer
@SpringBootApplication
public class ConfigServerApplication {

	public static void main(String[] args) {
		SpringApplication.run(ConfigServerApplication.class, args);
	}
}
向配置文件中添加服务的基本信息及Git仓库的相关信息
spring:
  application:
    name: config-server
  cloud:
    config:
      server:
        git:
          uri: https://github.com/Username/repo.git
          search-paths: /config-repo
          username: zepenglin666@163.com
          password: xxx
server:
  port: 7001
eureka:
  client:
    service-url:
      defaultZone: http://localhost:1111/eureka
其中Git相关配置信息表示意义如下:
- spring.cloud.config.git.uri:git仓库位置
- spring.cloud.config.git.searchPaths:配置仓库下的相对搜索位置,可以配置多个
- spring.cloud.config.server.git.username:访问Git仓库的用户名
- spring.cloud.config.server.git.password:访问Git仓库的用户密码
获取配置规则
在Git仓库的搜索路径下的配置文件命名规则为{application-name}-{profile}.properties,对应分支为{label},则获取配置的URl对应则为:
http://localhost:7001/${application}/${profile}/{label}
其他URL映射关系如下:
- /{application}-{profile}.yml
- /{label}/{application}-{profile}.yml
- /{application}-{profile}.properties
- /{label}/{application}-{profile}.properties
例获取配置如下,其中soure节为配置信息,version为版本信息,对应分支提交的commit号
{
    "name": "didispace",
    "profiles": [
        "prod"
    ],
    "label": "config-label-test",
    "version": "97002a4684815aafdcc5565c10dafd515a690c24",
    "state": null,
    "propertySources": [
            {
            "name": "https://github.com/Username/repo.git/config-repo/didispace-prod.properties",
            "source": {
            "from": "git-prod-2.0"
            }
        },
            {
            "name": "https://github.com/Username/repo.git/config-repo/didispace.properties",
            "source": {
            "from": "git-default-2.0"
            }
        }
    ]
}
注:服务端从Git仓库地址获取的配置文件信息或缓存到本地配置仓库,可防止当git仓库故障时无法加载的配置信息的情况
搭建简单的配置客户端
加入关键依赖:
		<dependency>
			<groupId>org.springframework.cloud</groupId>
			<artifactId>spring-cloud-starter-config</artifactId>
		</dependency>
		<dependency>
			<groupId>org.springframework.boot</groupId>
			<artifactId>spring-boot-starter-web</artifactId>
		</dependency>
创建Spring Boot应用主类并配置bootstrap.yml文件(此处的配置必须配置在bootstrap.yml内)
spring:
  application:
    name: didispace
  cloud:
    config:
      profile: dev
      label: master
      uri: http://localhost:7001/
server:
  port: 7002
- spring.application.name:对应配置文件规则中的{application}部分
- spring.cloud.config.profile:对应配置文件规则中的{profile}部分
- spring.cloud.config.label:对应配置文件规则中的{label}部分
- spring.cloud.config.uri:配置中心config-server的地址
获取配置信息-通过@Value注解获取:
@RestController
@RefreshScope
public class TestController {

    @Value("${from}")
    private String from;

    @GetMapping("/from")
    public String from() {
        return this.from;
    }
}
服务端进阶之Git仓库配置
占位符配置URI
spring:
  cloud:
    config:
      server:
        git:
          uri: https://github.com/Username/{application}
其中uri中{application}或使用客户端的application.name属性替换,{label}、{profile}亦同理
配置多个仓库
spring:
  cloud:
    config:
      server:
        git:
          uri: https://github.com/ZeponLin/spring-config-learning.git
          repos:
            dev:
              uri: file://home/git/config-repo
子目录存储
加入占位符的子目录存储
spring:
  cloud:
    config:
      server:
        git:
          searchPaths: {application}
客户端进阶
uri指定配置中心
spring:
  cloud:
    config:
      uri: http://localhost:7001/
服务化配置中心
首先先在Config Server及客户端下加入Eureka依赖
  <dependency>
      <groupId>org.springframework.cloud</groupId>
      <artifactId>spring-cloud-starter-eureka</artifactId>
  </dependency>
加入依赖后需要在application.yml/bootstrap.yml中指定服务注册中心并在应用主类上加上@EnableDiscoveryClient注解,如下:
eureka:
  client:
    serviceUrl:
      defaultZone: http://localhost:1111/eureka/
客户端可以在配置文件中指定配置中心的服务名,如下:
spring:
  cloud:
    config:
      discovery:
        enabled: true
        serviceId: config-server
注:其中sericeId对应为配置中心的服务名
失败快速响应及重试
失败快速响应即优先判断从config-server获取是否正常,并快速响应失败内容,需要在配置文件bootstrap.yml中加入如下配置:
spring:
 cloud:
   config:
     failFast: true
但考虑到网络波动等原因,只设置快速失败响应则启动失败的代价过高,自动重试功能可以解决此问题,先加入如下依赖:
  <dependency>
      <groupId>org.springframework.retry</groupId>
      <artifactId>spring-retry</artifactId>
  </dependency>

  <dependency>
      <groupId>org.springframework.boot</groupId>
      <artifactId>spring-boot-starter-aop</artifactId>
  </dependency>
重新启动后可以看到重试到第六次后才返回启动失败的信息,另外相关参数可以配置,含义如下:
spring:
  cloud:
    config:
      retry:
        multiplier: 1000 #初始重试时间间隔,单位为毫秒,默认为1000
        initial-interval: 1.1 #下一间隔的乘数,默认为1.1,即初始间隔为1000毫秒,则下一次失败间隔为1100毫秒
        max-interval: 2000 #最大间隔时间,默认为2000毫秒
        max-attempts: 6 #最大重试次数,默认为6
动态刷新配置
即在客户端不重启的情况下重新从配置中心获取配置信息
首先需加入actuator模块,该模块包含了/refresh端点的实现,用于实现客户端配置信息的重新获取及刷新
  <dependency>
    <groupId>org.springframework.boot</groupId>
    <artifactId>spring-boot-starter-actuator</artifactId>
  </dependency>
重新启动后,访问/refresh端点触发客户端重新获取即刷新配置信息的操作
安全保护
验证
引入依赖
    <dependency>
        <groupId>org.springframework.cloud</groupId>
        <artifactId>spring-cloud-starter-security</artifactId>
    </dependency>
配置中心用户名及密码
spring:
  cloud:
    config:
      username: admin
      password: 123456
加密解密
spring Cloud Config 提供了加密解密的功能,以保护配置文件中信息安全。具体应用场景为某些应用内较为重要的配置信息不以明文显示,而是以加密后的密文显示,并在启动时向配置中心发送并解密,加密方式支持对称加密及非对称加密,以下以对称加密为例:
这里使用加密有前提条件,即配置中心需运行在不限长度的JCE版本(Unlimited Strength JAVA Cryptography Extension)环境中,JRE需加载新的JCE jar包。jar包可以在官网获取,之后解压后将local_policy.jar及US_export_policy.jar复制到$JAVA_HOME/jre/lib/security目录下并替换源文件。
之后启动配置中心,会出现以下端点:
/encrpt/status:查看加密功能状态的端点(请求方式为GET)/key:查看密钥的端点 (请求方式为GET)/encrpt:对请求的body内容进行加密的端点 (请求方式为POST)/decrpt:对请求的body内容进行解密的端点 (请求方式为POST)
下面配置对称加密的密钥,在bootstrap.yml中加入如下配置:
encrpt:
  key:
    keyword
之后重启后可以访问/encrpt及/decrpt进行加密及解密处理。加密的后的信息可以在配置客户端中以如下方式显示,启动时向服务端请求解密:
spring:
  datasoure:
    password: '{cipher}366266a6a79960134ded56676c9714da61b37f5eb3af9f1a5149e086f48ab9fe'
除了对称加密外,Spring Cloud Config还支持非对称加密形式(RSA密钥对)。首先先利用JDK自带的keytool工具生成密钥对,在%JAVA_HOME%\bin\keytool.exe路径下找到该工具,输入如下指令并按指示操作:
keytool -genkeypair -alias config-server -keyalg RSA -keystore config-server.keystore
需要在配置中心加入如下配置:
encrypt:
  key-store:
    location: config-server.jks
    alias: config-server
    password: password
    secret: secret
非对称加密在配置客户端,客户端会先对该base64编码的加密字符串十六进制解码,暂时找不到原因(此处有坑,暂记),以下展示的为在配置中心的加密字符串配置方式:
my:
  secret-str: '{cipher}{key:config-server}......'
**注:**其中{key:my-key-alias}中config-server为密钥库中的密钥对的别名。一个密钥库有一个密码,为encrypt.key-store.password的值,而密钥库中可以有多个密钥对,故密钥名有别名,即上面配置的encrypt.key-store.alias的值,密钥对还有自己的密码,为encrypt.key-store.secret的值
高可用配置
Spring Cloud Config 的高可用配置分为两个模式,传统模式及服务模式:
-
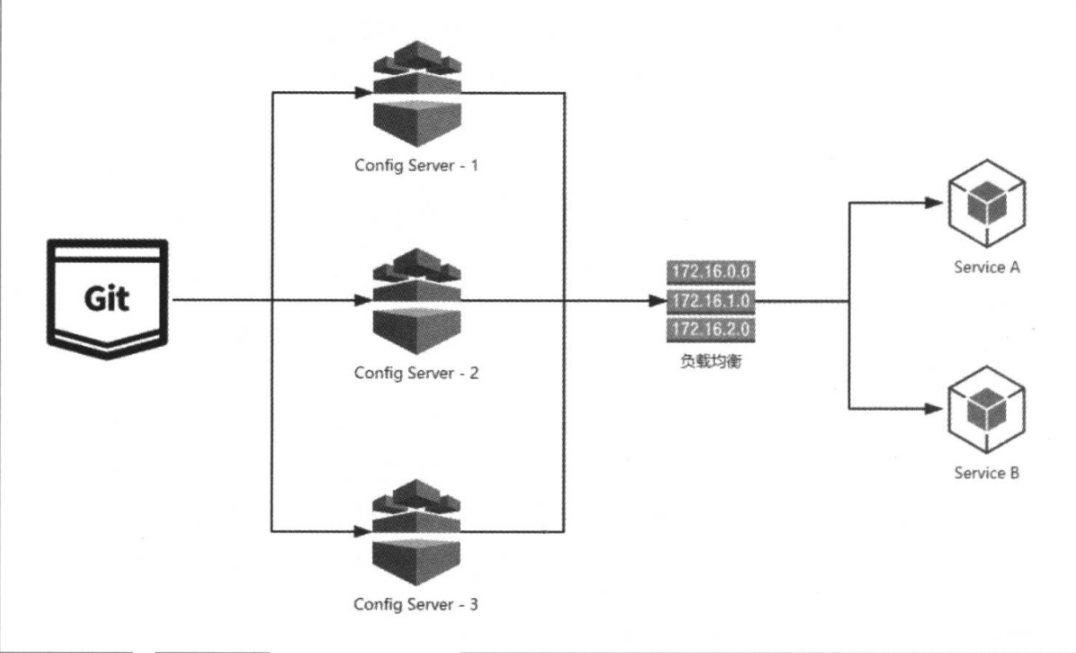
传统模式:不需要为多个服务端做任何额外的配置,只需要遵守所有的Config Server 都指向同一个Git仓库,这样所有的Server通过一个共享的文件系统来维护,再在多个配置中心接一个负责均衡设备,客户端配置配置中心地址直接指向设备地址即可,具体如下图所示

-
服务模式:即将配置中心和客户端一起纳入到Eureka的服务治理体系中,这样可通过服务名来指定配置中心,也可使用自带的客户端负载均衡,即实现了高可用,又实现了自维护