在如何使UT产生更多的价值上,spring组件spring-rest-docs提供了通过UT产生API的文档碎片的方法,将碎片及补充部分的文档说明整合到一起,可以生成静态的API文档,下面简单介绍一下使用方法。
注入依赖
引入Spring Rest Docs的依赖。
<dependencies>
    <dependency>
        <groupId>org.springframework.restdocs</groupId>
        <artifactId>spring-restdocs-mockmvc</artifactId>
        <scope>test</scope>
    </dependency>
</dependencies>
在maven插件中引入spring-restdocs-asciidocto依赖,并设置插件的运行目标、运行生命周期及设置运行参数。以下对重要的设置参数进行说明。
- sourceDirectory: 源文档(根文档)的目录位置,默认为
${basedir}/src/main/asciidoc - outputDirectory: 生成文档的输出目录,默认为
${project.build.directory}/generated-docs - backend: 输出文档的格式,默认为
docbook - doctype:文档类型,默认为
article
<properties>
    <asciidoctor.version>1.5.5</asciidoctor.version>
    <apiDocument.sourceDir>docs/source</apiDocument.sourceDir>
    <apiDocument.outputDir>docs/html</apiDocument.outputDir>
</properties>
<build>
    <plugins>
        <plugin>
            <groupId>org.asciidoctor</groupId>
            <artifactId>asciidoctor-maven-plugin</artifactId>
            <version>${asciidoctor.version}</version>
            <executions>
                <execution>
                    <id>generate-docs</id>
                    <phase>test</phase>
                    <goals>
                        <goal>process-asciidoc</goal>
                    </goals>
                    <configuration>
                        <sourceDirectory>${apiDocument.sourceDir}</sourceDirectory>
                        <outputDirectory>${apiDocument.outputDir}</outputDirectory>
                        <backend>html</backend>
                        <doctype>book</doctype>
                    </configuration>
                </execution>
            </executions>
            <dependencies>
                <dependency>
                    <groupId>org.springframework.restdocs</groupId>
                    <artifactId>spring-restdocs-asciidoctor</artifactId>
                    <version>2.0.1.RELEASE</version>
                </dependency>
            </dependencies>
        </plugin>
    </plugins>
</build>
编写UT
所生成的文档通过UT生成的,且为MVC中controller层次的UT产生,下面为一个简单接口(通过id查找用户)编写文档生成功能的UT,UT部分的代码不再赘述。
@RunWith(SpringRunner.class)
@WebMvcTest(UserController.class)
@AutoConfigureRestDocs(Constant.API_DOCUMENT_SNIPPETS_DIR)
public class UserControllerTests {

    @Autowired
    private MockMvc mockMvc;

    @MockBean
    private UserService userService;

    private final ConstraintDescriptions userConstraints = new ConstraintDescriptions(User.class);

    @Test
    public void findUserSuccess() throws Exception {
        given(userService.findUser("10000")).willReturn(new User("jackson", 12, 10000));
        mockMvc.perform(get("/user")
                .param("id", "10000"))
                .andExpect(content().contentType(MediaType.APPLICATION_JSON_UTF8))
                .andExpect(status().isOk())
                .andDo(document("user-find",
                            requestParameters(
                                    parameterWithName("id").description("用户id")
                            ),
                            responseFields(
                                    fieldWithPath("id").description("用户id"),
                                    fieldWithPath("name").description("用户名"),
                                    fieldWithPath("age").description("年龄")
                            )
                        )
                    );
        verify(userService).findUser(anyString());
    }
}
首先需要在单元测试类上加入注解@AutoConfigureRestDocs(Constant.API_DOCUMENT_SNIPPETS_DIR),注解内的值指定了生成文档片段的目录,此处将该值设置为业务常量。
然后在原mockMvc.perform()后加上了andDo()方法,document()方法第一个参数制定了生成片段的目录名称,即接口名称,结合第一步注解指定片段生成目录生成相应的子目录,后面的参数为相应片段生成的对接口内容的验证或者补充;requestParameter()生成了请求参数的文档片段,方法parameterWithName("id")验证了接口参数,description("用户id")补充了接口参数内容;responseFields()生成了相应字段的文档片段,fieldWithPath().description(),验证了响应内容及补充字段说明。
生成文档
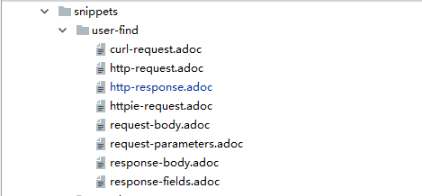
运行UT,可以得到注解指定的片段文件夹目录下接口名称目录下的文档片段,如下图所示。

然后编辑maven插件内设置的配置参数<sourceDirectory>指定下的源文件,在目录下新建文件source.adoc,并加入下图所示的内容:
= DEMO PROJECT API DOCUMENT
Zepon Lin <demo123@demo.com>
v1.0, February 12, 2018: First incarnation

DEMO,demo示例.

== Find User

通过id查找用户信息。

operation::user-find[snippets='curl-request,http-request,request-parameters,response-body,response-fields']
开头三行指定文档的大标题和作者邮箱版本等文档基本信息,具体编写规则可以查看asciitor的官方文档,此处不再赘述。
后面指定了接口的标题和概述内容,operation::user-find[]是定义的一个asiidoctor的宏操作,作用为引入指定接口的指定类型的文档片段,其中user-find为文档片段的接口名称,即UT内document()第一个参数所指定的名称,[snippets='curl-request,...']指定了引入文档片段的的类型,即接口目录下的不同文档片段。
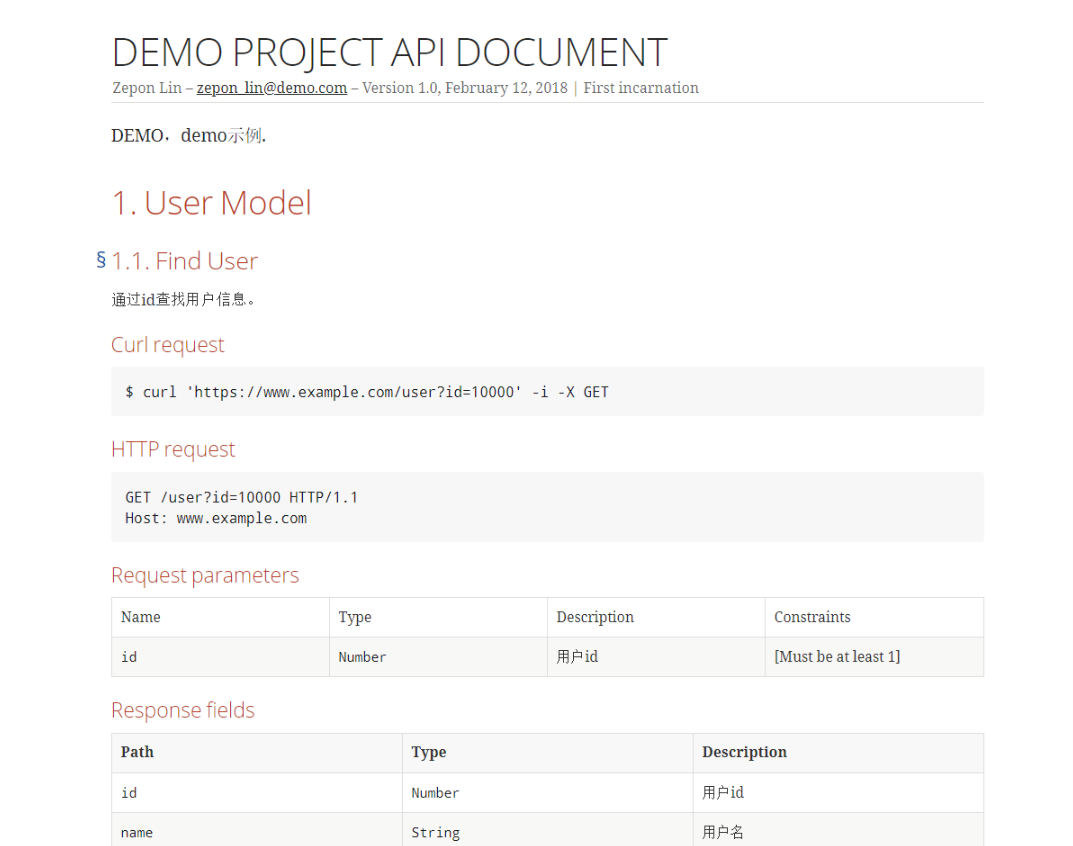
项目目录下运行命令mvn clean test,可以看到pom.xml中<outputDirectory>中指定的输出目录下生成了名为source.html的文件(与source文件同名),最终显示效果如下:

进阶
各传参方式的接口文档生成方式
文件上传形式
在web项目中涉及到文件上传是很常见的,下面是一个功能为返回上传文件的大小的接口,编码如下:
@RestController
@AllArgsConstructor
public class DocumentController {

    private final FileService fileService;

    @PostMapping(value = "/document/size", consumes = MULTIPART_FORM_DATA_VALUE)
    public Map fileSize(MultipartFile file) {
        return Collections.singletonMap("size", fileService.getFileSize(file));
    }
}

@Slf4j
@Service
public class FileService {

    public long getFileSize(MultipartFile file) {
        long size = file.getSize();
        log.debug("file size of upload is {}", size);
        return size;
    }
}
编写对应的UT如下:
@RunWith(SpringRunner.class)
@WebMvcTest(DocumentController.class)
@AutoConfigureRestDocs(Constant.API_DOCUMENT_SNIPPETS_DIR)
public class DocumentControllerTests {

    @MockBean
    private FileService fileService;

    @Autowired
    private MockMvc mockMvc;

    @Test
    public void getDocumentSizeRightInput() throws Exception {
        MockMultipartFile uploadFile = new MockMultipartFile("file", "example.txt", TEXT_PLAIN_VALUE, "<<text-content>>".getBytes());
        BDDMockito.given(fileService.getFileSize(uploadFile)).willReturn(uploadFile.getSize());
        mockMvc.perform(multipart("/document/size").file(uploadFile))
                .andExpect(status().isOk())
                .andExpect(content().contentType(APPLICATION_JSON_UTF8))
                .andExpect(jsonPath("size").isNumber())
                .andDo(document("get-document-size",
                            requestParts(
                                    partWithName("file").description("待检测大小的文件")
                            ),
                            responseFields(
                                    fieldWithPath("size").description("文件大小,单位为字节")
                            )
                        )
                    );
    }
}
注: 重点在于requestParts(partWithName("paramName").description("param description"))方法生成了名为request-parts.adoc的文档片段。
文件上传并带有其他类型参数
下面是一个功能为上传文件并保存的接口
@RestController
@AllArgsConstructor
public class DocumentController {

    private final FileService fileService;

    @ResponseStatus(CREATED)
    @PostMapping(value = "/document/upload", consumes = MULTIPART_FORM_DATA_VALUE)
    public void checkDocumentType(MultipartFile file, String owner) {
        fileService.saveFile(file, owner);
    }
}
接口参数分为两部分文档片段,利用requestParts()及requestParameters()方法生成request-parameters.adoc及request-parts.adoc两部分文档,具体UT如下:
@RunWith(SpringRunner.class)
@WebMvcTest(DocumentController.class)
@AutoConfigureRestDocs(Constant.API_DOCUMENT_SNIPPETS_DIR)
public class DocumentControllerTests {

    @MockBean
    private FileService fileService;

    @Autowired
    private MockMvc mockMvc;

    @Test
    public void uploadDocumentRightInput() throws Exception {
        MockMultipartFile uploadFile = new MockMultipartFile("file", "example.txt", TEXT_PLAIN_VALUE, "<<text-content>>".getBytes());
        mockMvc.perform(multipart("/document/upload")
                .file(uploadFile)
                .param("owner", "jackson"))
                .andExpect(status().isCreated())
                .andDo(document("upload-file",
                            requestParts(
                                    partWithName("file").description("上传文件")
                            ),
                            requestParameters(
                                    parameterWithName("owner").description("上传文件所有者名称")
                            )
                        )
                    );
        verify(fileService).saveFile(any(MultipartFile.class), anyString());
    }
}
JSON形式传参
以下是一个功能为删除指定用户名、id及年龄的一个接口,代码如下:
@Slf4j
@RestController
@AllArgsConstructor
public class UserController {

    private final UserService userService;

    @ResponseStatus(NO_CONTENT)
    @DeleteMapping(value = "/user", consumes = APPLICATION_JSON_UTF8_VALUE)
    public void deleteUser(@RequestBody User user) {
        userService.deleteUser(user);
    }
}
传参形式的接口需要使用requestFields()方法生成文档片段request-fields.adoc,UT代码如下:
@RunWith(SpringRunner.class)
@WebMvcTest(UserController.class)
@AutoConfigureRestDocs(Constant.API_DOCUMENT_SNIPPETS_DIR)
public class UserControllerTests {

    @Autowired
    private MockMvc mockMvc;

    @MockBean
    private UserService userService;

    @Autowired
    private ObjectMapper mapper;

    @Test
    public void deleteUserSuccess() throws Exception {
        mockMvc.perform(delete("/user")
                .contentType(MediaType.APPLICATION_JSON_UTF8)
                .content(mapper.writeValueAsString(new User("jackson", 18, 123))))
                .andExpect(status().isNoContent())
                .andDo(document("user-delete",
                            requestFields(
                                    fieldWithPath("id").description("用户id"),
                                    fieldWithPath("name").description("用户名"),
                                    fieldWithPath("age").description("用户年龄")
                            )
                        )
                );
        verify(userService).deleteUser(any());
    }
}
路径参数
以下是一个功能为验证指定id用户是否存在的接口,传参方式为路径传参,代码如下:
@GetMapping("/user/{id}")
public Map<String, Boolean> existUser(@PathVariable("id") int id) {
    return Collections.singletonMap("exist", userService.isExist(id));
}
路径参数需要使用方法pathParameters()产生名为path-parameters.adoc的文档片段,UT代码如下:
@Test
public void existUserSuccess() throws Exception {
    mockMvc.perform(get("/user/{id}", 123))
            .andExpect(status().isOk())
            .andDo(document("user-exist",
                        pathParameters(
                                parameterWithName("id").description("用户id")
                        )
                    )
            );
    verify(userService).isExist(anyInt());
}
重定义文档片段格式
对于默认的文档片段格式可能不满足需求,spring-rest-docs也提供了重定义默认文档片段格式的功能,但是有格式限制的。举例,我们希望参数生成的文档表格中能有字段类型和限制的列,虽然可以从curl-request等一些片段得到,但不够直观,所以可以重新定义表格的结构。
这里涉及到了传参限制的问题,如果我们的参数是序列化成实体,且满足Validation 2.0规范,可以调用方法ConstraintDescriptions userConstraints = new ConstraintDescriptions(Class<?> clazz)得到该model类的各字段限制描述,此处不具体讲解如何使用该参数校验的使用方法,有兴趣的可以查阅相关资料。
编写UT如下,关键方法为attributes(key("your-key").value("your-value")),向生成表格的行
追加属性。
private final ConstraintDescriptions userConstraints = new ConstraintDescriptions(User.class);

@Test
public void findUserSuccess() throws Exception {
    given(userService.findUser("10000")).willReturn(new User("jackson", 12, 10000));
    mockMvc.perform(get("/user")
            .param("id", "10000"))
            .andExpect(content().contentType(MediaType.APPLICATION_JSON_UTF8))
            .andExpect(status().isOk())
            .andDo(document("user-find",
                        requestParameters(
                                parameterWithName("id").description("用户id")
                                        .attributes(
                                                key("constraints").value(userConstraints.descriptionsForProperty("id")),
                                                key("type").value("Number")
                                        )
                        ),
                        responseFields(
                                fieldWithPath("id").description("用户id"),
                                fieldWithPath("name").description("用户名"),
                                fieldWithPath("age").description("年龄")
                        )
                    )
            );
    verify(userService).findUser(anyString());
}
编写UT后需要给出一个新定义的模板片段,并命名为request-parameters.snippet,内容如下所示,加入了两个新定义的字段作为表格的两个新的列,还可以定义表头,但中文下会有乱码,目前还没找到具体原因。最后,将模板存放目录test\resources\org\springframework\restdoc\templates\asciidoctor,其中test是测试目录,resources是其资源目录,
|===
|Name|Type|Description|Constraints
{{#parameters}}
|{{#tableCellContent}}`{{name}}`{{/tableCellContent}}
|{{#tableCellContent}}`{{type}}`{{/tableCellContent}}
|{{#tableCellContent}}{{description}}{{/tableCellContent}}
|{{#tableCellContent}}{{constraints}}{{/tableCellContent}}
{{/parameters}}
|===
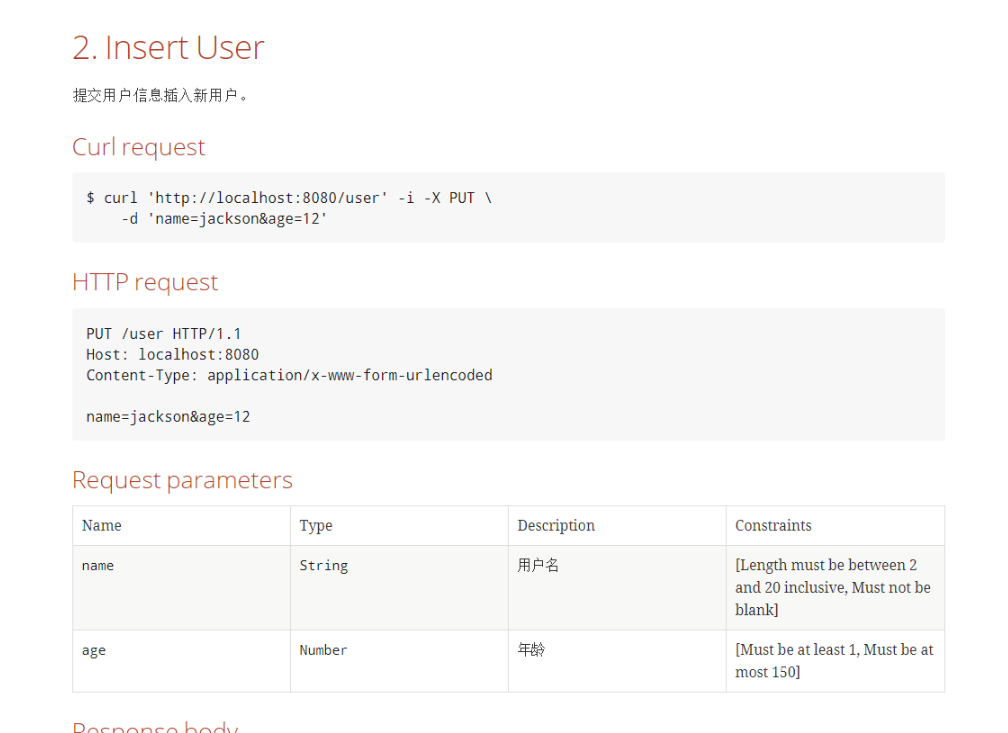
显示效果如下:

在生成文档的表格前,会先去读取默认的片段模板,其他类型的默认模板可以在下图所示依赖的位置找到。

注: 如果用自定义模板覆盖了默认的片段模板,其他的UT的该片段信息生成也要与其保持一致规则,缺少了规定列的信息UT会报错。
配置
MockMvc URI 自定义
默认不配置的情况下,通过Spring REST Docs 生成的片段中关于URIs部分信息默认值如下所示:
| Setting | Default |
|---|---|
| Scheme | http |
| Host | localhost |
| Port | 8080 |
修改方式有两种,第一种在UT类的@AutoConfigureRestDocs注解配置参数,如下:
@@AutoConfigureRestDocs(outputDir = Constant.API_DOCUMENT_SNIPPETS_DIR, uriScheme = "https", uriPort = 443, uriHost = "www.example.com")
第二种为直接代码配置MockMvc的参数,如下:
this.mockMvc = MockMvcBuilders.webAppContextSetup(this.context)
        .apply(documentationConfiguration(this.restDocumentation).uris()
                .withScheme("https")
                .withHost("example.com")
                .withPort(443))
        .build();
文档参数配置
同样有两种配置方式,第一种为源文件夹内文档开头处设置全局属性,如下:
= Top HEADER
:doctype: book
:icons: font
:toc: left
:toclevels: 4
:sectnumlevels: 1
:hardbreaks:
:sectlinks:
:numbered:
:sectanchors:
第二种为pom.xml内配置,如下:
<configuration>
    <sourceDirectory>${apiDocument.sourceDir}</sourceDirectory>
    <outputDirectory>${apiDocument.outputDir}</outputDirectory>
    <backend>html5</backend>
    <doctype>book</doctype>
    <attributes>
        <icons>font</icons>
        <toc>left</toc>
        <toclevels>4</toclevels>
        <numbered>true</numbered>
        <hardbreaks>true</hardbreaks>
        <sectnumlevels>1</sectnumlevels>
        <sectlinks>true</sectlinks>
        <sectanchors>true</sectanchors>
    </attributes>
</configuration>
总结
API文档是一个编写完业务代码和单元测试代码后一个繁琐的工作,但它同时又是不可缺少的。在前后端分离的项目中,它成为前后之间的唯一联系,表意清晰,直观易懂的API文档能协助前端更好地对接接口。API文档自动生成框架除去Spring REST Docs组件,还有Spring Fox组件。
Spring REST Docs有如下优点:
- 不侵入业务代码;
- 结合UT验证接口行为,做到生成的文档与实际情况相符;
- asciidoc语法虽然比MarkDown略难,但功能却更强大,使得组件生成文档的表现力也比较强;
但同时也需要注意到它有着如下的缺点:
- 生成的文档分布为各个类型的片段,完整的文档生成需要在源文档文件中拼凑片段,比较麻烦(重点);
- 不基于OpenAPI规范产生,通用性不够高;
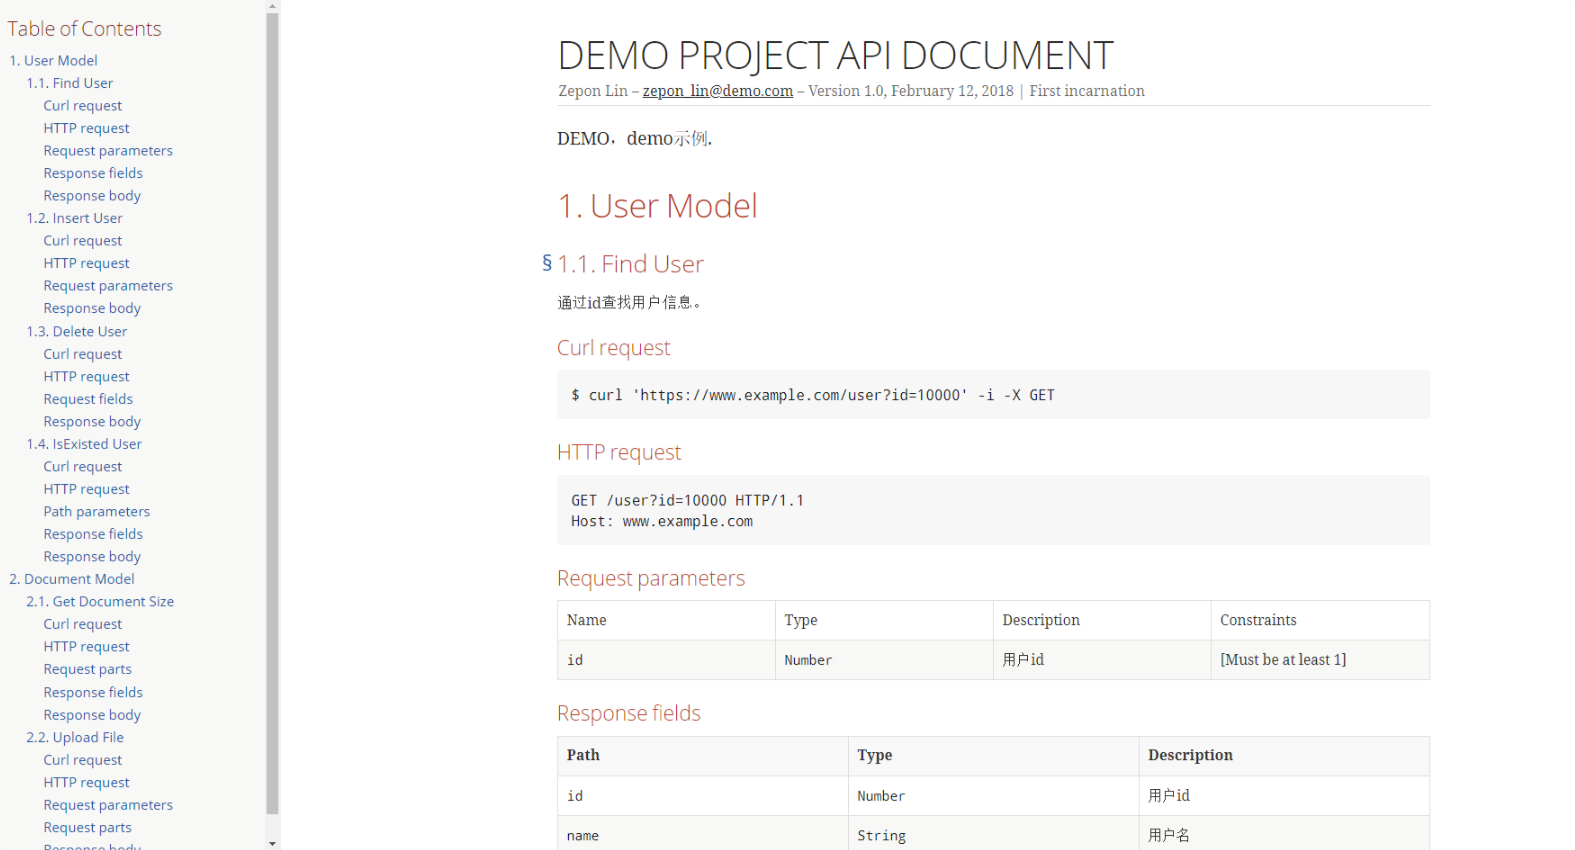
在实际项目中使用该组件应该权衡其利弊后决定是否使用,关键在于是否使API管理及对接更加高效了,最后贴一下以上接口生成的完整文档展示图:
