概述
由于某些奇怪的需求😥,导致有很多项目需要登录及注册等相关功能,每个项目都复制一套登录注册接口的代码显然不利于代码复用及升级更新功能,另外在多个项目重复输入账号密码登录也是比较差的用户体验,因此单点登录系统的需求由此产生。
首先简单了解一下是什么单点登录,即SSO。
单点登录(Single Sign On),简称为 SSO,是目前比较流行的企业业务整合的解决方案之一。SSO的定义是在多个应用系统中,用户只需要登录一次就可以访问所有相互信任的应用系统。——百度百科
以下介绍一下两种常见的单点登录的解决方案。
cookie实现登录凭证跨域共享
由于打通登录的应用都互相信任,所以可以给各个应用设置同样的顶级域名和二级域名,如demo.com,当用户在某个应用上登录成功时同时生成一个domian属性为demo.com且内容为加密登录凭证的cookie,该cookie可以在*.demo.com域名的应用间共享,在cookie有效期内登录其他应用时,解密携带凭证信息的cookie从而实现跨域免密登录,流程如下图所示。
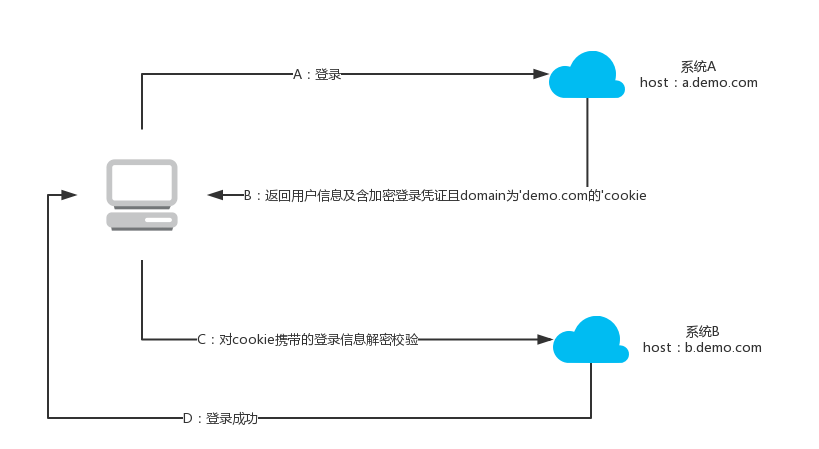
该方式的优缺点:
- 优点:简单,易于实现;
- 缺点:不安全。由于登录凭证存放在cookie,等于是存放凭证在客户端,虽然有加密凭证等可以提高安全性,但还是会降低安全性;另外一个缺点就是这种方式并没用统一登录入口。
OAuth2.0验证机制统一登录入口及资源获取
首先简单了解一下用于验证及授权的OAuth协议,
OAuth(开放授权)是一个开放标准,允许用户让第三方应用访问该用户在某一网站上存储的私密的资源(如照片,视频,联系人列表),而无需将用户名和密码提供给第三方应用。——百度百科
OAuth 2.0是该协议的2.0版本,2012年10月,OAuth 2.0协议正式发布为RFC 6749。下图是OAuth标准授权流程,即 Authorization Code Grant模式的示意图。

该方式的优缺点:
- 优点:将登录逻辑从各应用处抽取出来,统一了登录入口;
- 缺点:登录授权过程需要重定向多次,实现起来比较复杂;
流程梳理
经过比较两种SSO实现方式的优缺点,最终选择了OAuth2.0协议实现方式。
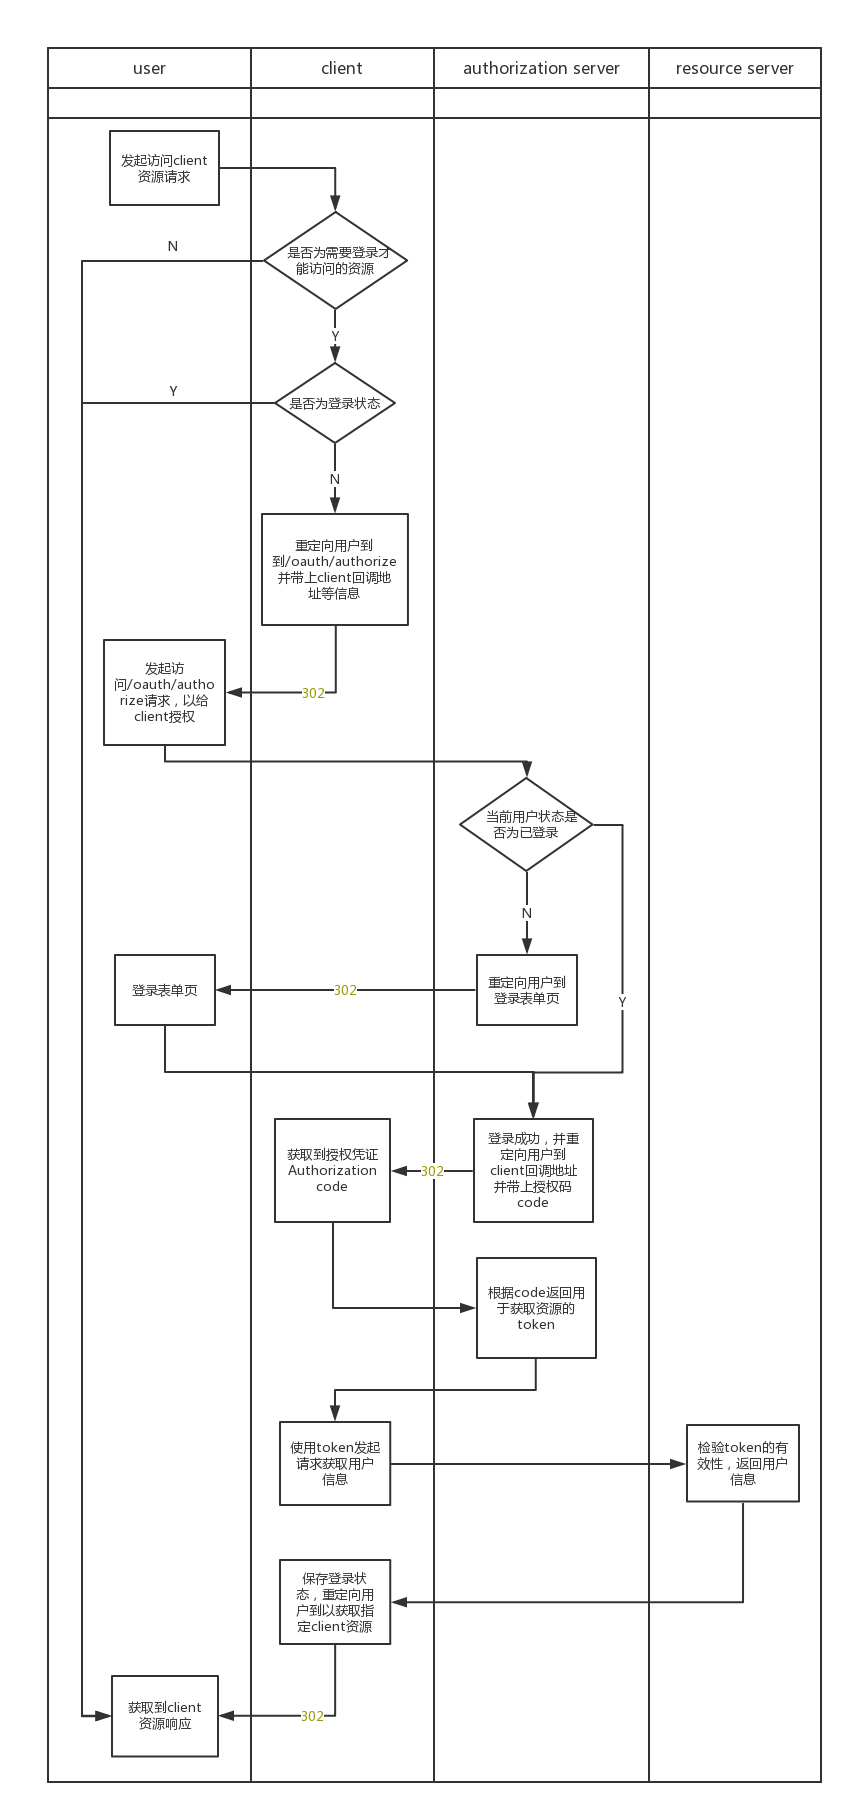
SSO OAuth2.0登录授权流程梳理,如下图所示:
简单配置及使用
在选用OAuth2.0协议作为SSO的实现方式后,需要选定一个实现了该协议流程的框架来简化开发。经过比较后,最终选定Spring Security SSO。
由流程图可以得出,主要需要配置开发有三部分,分别为client、authorizetion server及resource server,由于resource server本身需要实现功能比较简单,所以authorizetion server和resource server本身可以是一个应用。这里先展示一下简单的配置实现,获取demo代码点击此处。
示例demo有三个应用的代码,分别为Auth-server、ui和ui2三个应用。
Auth-server
Auth-server实现了authorizetion server以及resource server,首先需要注入依赖,如下
<dependencies>
    <dependency>
        <groupId>org.springframework.boot</groupId>
        <artifactId>spring-boot-starter-web</artifactId>
    </dependency>
    <dependency>
        <groupId>org.springframework.security.oauth</groupId>
        <artifactId>spring-security-oauth2</artifactId>
        <version>2.3.3.RELEASE</version>
    </dependency>
</dependencies>
配置一下OAuth2认证的一些参数,即demo中的AuthServerConfig文件,如下所示:
package org.baeldung.config;

import org.springframework.beans.factory.annotation.Autowired;
import org.springframework.context.annotation.Configuration;
import org.springframework.security.crypto.bcrypt.BCryptPasswordEncoder;
import org.springframework.security.oauth2.config.annotation.configurers.ClientDetailsServiceConfigurer;
import org.springframework.security.oauth2.config.annotation.web.configuration.AuthorizationServerConfigurerAdapter;
import org.springframework.security.oauth2.config.annotation.web.configuration.EnableAuthorizationServer;
import org.springframework.security.oauth2.config.annotation.web.configurers.AuthorizationServerSecurityConfigurer;


@Configuration
@EnableAuthorizationServer
public class AuthServerConfig extends AuthorizationServerConfigurerAdapter {

    @Autowired
    private BCryptPasswordEncoder passwordEncoder;

    @Override
    public void configure(final AuthorizationServerSecurityConfigurer oauthServer) throws Exception {
        oauthServer.tokenKeyAccess("permitAll()")      // 配置哪些对应方法下URI资源需要(及不需要)用token换取
            .checkTokenAccess("isAuthenticated()");
    }

    @Override
    public void configure(final ClientDetailsServiceConfigurer clients) throws Exception {
        clients.inMemory()     // 向认证服务配置用于验证的client信息,默认可供选择的有内存读取及jdbc方式读取client信息
            .withClient("SampleClientId")
            .secret(passwordEncoder.encode("secret"))
            .authorizedGrantTypes("authorization_code")
            .scopes("user_info")
            .autoApprove(true)      // 由于注册应用都是可信的,因此设置用户自动确认授权给该应用,简化授权流程,实现多应用静默登录
            .redirectUris("http://localhost:8082/ui/login","http://localhost:8083/ui2/login","http://localhost:8082/login")  // 需要注意的是此处设置的是应用可接受的回调地址
        ;
    }

}
设置用户认证的配置,即demo中的SecurityConfig文件,包括用户认证信息及哪些资源需要认证,如下所示:
package org.baeldung.config;

import org.springframework.context.annotation.Bean;
import org.springframework.context.annotation.Configuration;
import org.springframework.core.annotation.Order;
import org.springframework.security.config.annotation.authentication.builders.AuthenticationManagerBuilder;
import org.springframework.security.config.annotation.web.builders.HttpSecurity;
import org.springframework.security.config.annotation.web.configuration.WebSecurityConfigurerAdapter;
import org.springframework.security.crypto.bcrypt.BCryptPasswordEncoder;

@Configuration
@Order(1)
public class SecurityConfig extends WebSecurityConfigurerAdapter {

    @Override
    protected void configure(HttpSecurity http) throws Exception {
        http.requestMatchers()
            .antMatchers("/login", "/oauth/authorize") // 指定哪些路径不需要resource认证
            .and()
            .authorizeRequests()
            .anyRequest()
            .authenticated()   // 指定所有路径需要认证
            .and()
            .formLogin()   // 指定用户登录认证通过表单
            .permitAll();
    }

    @Override
    protected void configure(AuthenticationManagerBuilder auth) throws Exception {
        auth.inMemoryAuthentication()    // 指定用户信息内存存储,此外还有jdbc存储方式
            .withUser("john")   // 以下位指定用户名、加密的密码及用户角色
            .password(passwordEncoder().encode("123"))
            .roles("USER");
    }

    @Bean
    public BCryptPasswordEncoder passwordEncoder(){
        return new BCryptPasswordEncoder();    // 声明用于密码加密的encoder
    }
}
编写给OAuth2客户端获取的用户信息资源接口:
package org.baeldung.config;

import java.security.Principal;

import org.springframework.web.bind.annotation.RequestMapping;
import org.springframework.web.bind.annotation.RestController;

@RestController
public class UserController {

    /**
     * @param principal 用户认证后的实体,包含用户信息
     */
    @RequestMapping("/user/me")
    public Principal user(Principal principal) {
        System.out.println(principal);
        return principal;
    }
}
需要注意的是,由于此处项目的auth-server和resource-server是同一个,所以需要在application中打开@EnableResourceServer注解,如下所示:
@SpringBootApplication
@EnableResourceServer
public class AuthorizationServerApplication extends SpringBootServletInitializer {

    public static void main(String[] args) {
        SpringApplication.run(AuthorizationServerApplication.class, args);
    }

}
最后,在application.yml配置项目启动的端口及context-path,如下:
server:
  port: 8081
  servlet:
    context-path: /auth
ui-client & ui2-client
ui-client作为oauth的客户端,通过auth-server认证并获取指定资源。
首先,引入依赖,主要有两部分,一部分为客户端的OAuth认证自动配置,另一部分为thymeleaf模板引擎用于页面及数据的显示:
<dependencies>
    <dependency>
        <groupId>org.springframework.boot</groupId>
        <artifactId>spring-boot-starter-web</artifactId>
    </dependency>
    <dependency>
        <groupId>org.springframework.boot</groupId>
        <artifactId>spring-boot-starter-security</artifactId>
    </dependency>
    <dependency>
        <groupId>org.springframework.security.oauth.boot</groupId>
        <artifactId>spring-security-oauth2-autoconfigure</artifactId>
        <version>2.3.3.RELEASE</version>
    </dependency>
    <dependency>
        <groupId>org.springframework.boot</groupId>
        <artifactId>spring-boot-starter-thymeleaf</artifactId>
    </dependency>
    <dependency>
        <groupId>org.thymeleaf.extras</groupId>
        <artifactId>thymeleaf-extras-springsecurity4</artifactId>
    </dependency>
</dependencies>
配置需要通过认证的路径资源,类似于登录拦截器,如下所示:
package org.baeldung.config;

import org.springframework.boot.autoconfigure.security.oauth2.client.EnableOAuth2Sso;
import org.springframework.context.annotation.Configuration;
import org.springframework.security.config.annotation.web.builders.HttpSecurity;
import org.springframework.security.config.annotation.web.configuration.WebSecurityConfigurerAdapter;


@EnableOAuth2Sso
@Configuration
public class UiSecurityConfig extends WebSecurityConfigurerAdapter {

    @Override
    public void configure(HttpSecurity http) throws Exception {
        http.antMatcher("/**")
            .authorizeRequests()
            .antMatchers("/", "/login**")  // 除了“/”及“/login**”路径外的路径资源都需要认证才能访问
            .permitAll()
            .anyRequest()
            .authenticated();
    }
UiWebConfig主要为配置ViewController和静态资源的目录等,映射了两个位于resource目录下的静态页面主页index.html及认证页securedPage.html,具体配置和页面内容请参照demo内容此处不再赘述。
另外一个ui2-client项目是为了验证SSO的登录一次,不需要多次认证的client客户端,其项目内容除了端口和context-path,其他与ui-client基本一致。
功能展示
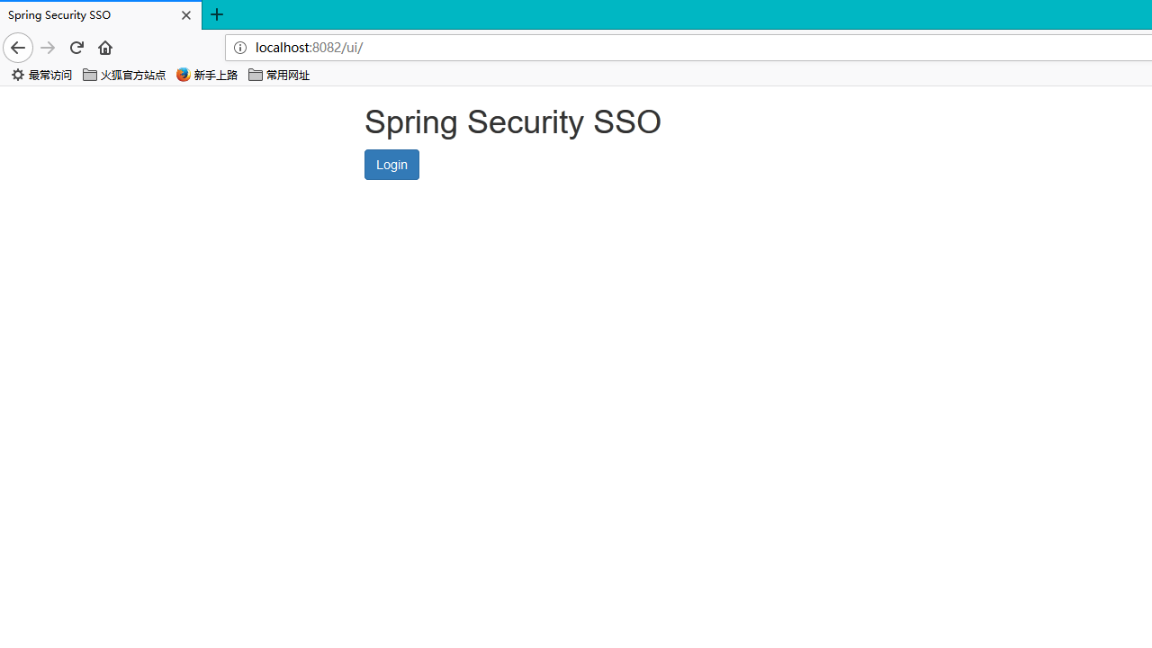
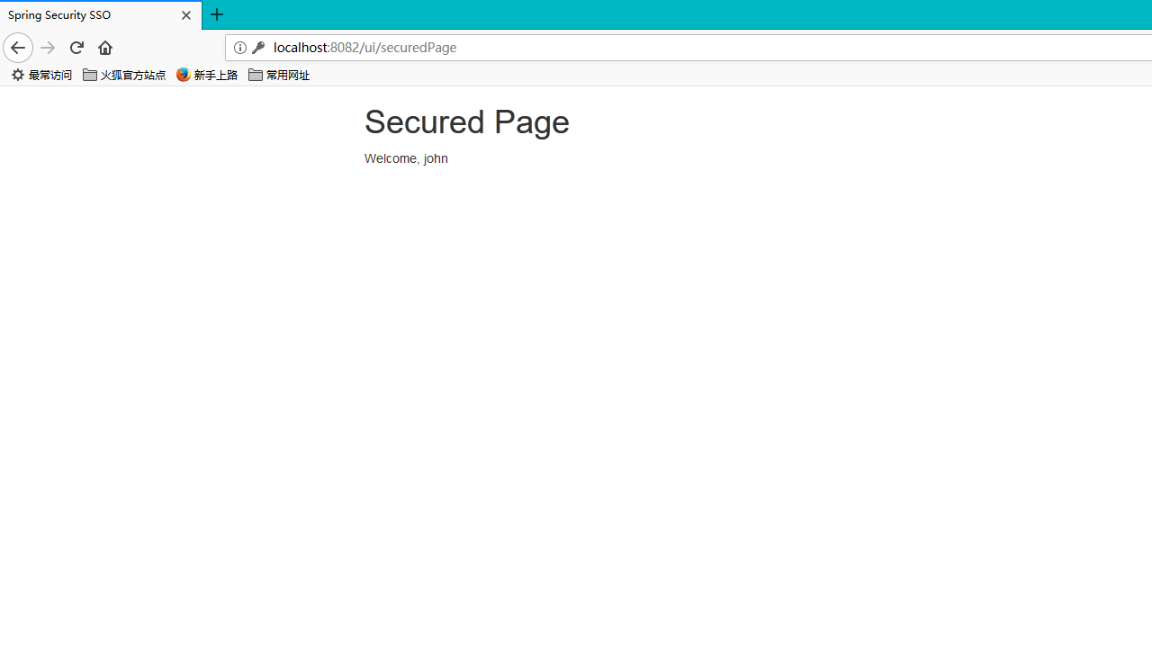
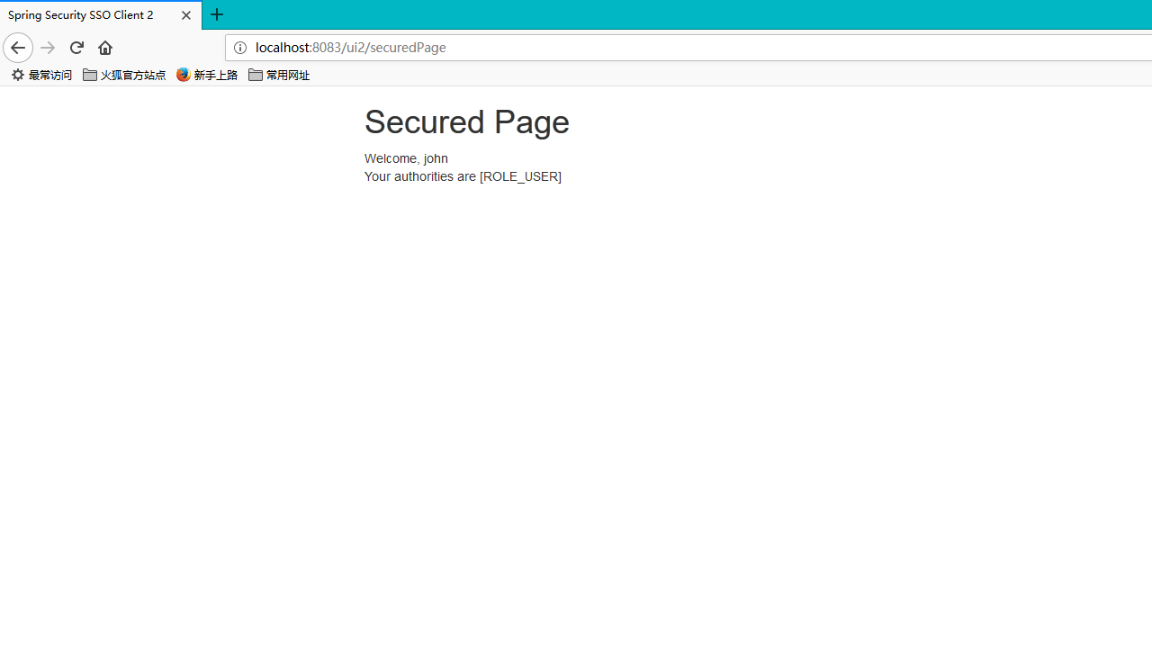
分别启动三个项目,访问ui-client的主页入口http://localhost:8082/ui/并点击login按钮后,重定向到auth-server的登录入口表单地址http://localhost:8081/auth/login,在该页面完成登录后重定向到ui-client的用户个人页http://localhost:8082/ui/securedPage,之后访问ui2-client个人主页会发现这次不会重定向到表单登录页,而是经过几次重定向后回到了ui2-client的个人主页,从而避免了在多个项目间重复登录的繁琐操作,实现了SSO最基本的功能,部分展示截图如下:

认证服务端自定义功能及配置
Spring Security SSO在登录授权过程中授权服务端某些处理支持自定义,以下列出主要的自定义操作实现方法。
自定义登录页
Spring Security的登录页是由过滤器生成的,UI比较简陋,替换登录页很常见的需求,具体配置如下:
@Override
protected void configure(HttpSecurity http) throws Exception {
    http.requestMatchers()
        .antMatchers("/login", "/oauth/authorize")
        .and()
        .authorizeRequests()
        .anyRequest()
        .authenticated()
        .and()
        .formLogin()
        .loginPage("http://localhost/login").loginProcessingUrl("/login")  // 设置登录页地址,并设置处理登录请求的路径
        .permitAll();
}
自定义登录处理逻辑
默认的登录处理逻辑仅仅只是验证了用户名和密码,是最为简单的登录处理。但是在实际项目中登录处理往往不会这么简单,比如我们可能为了防止恶意撞库,可能在登录时加上验证码辅助验证登录行为。在Spring Security中我们可以替换某些接口的实现类来达到替换处理逻辑的效果。
首先,假如我们需要额外的参数进行验证,就需要继承默认的认证过滤器UsernamePasswordAuthenticationFilter,并复写其中的attemptAuthentication()方法。具体如下所示:
import org.springframework.security.web.authentication.UsernamePasswordAuthenticationFilter;

public class CustomAuthenticationFilter extends UsernamePasswordAuthenticationFilter {

    @Override
    public Authentication attemptAuthentication(HttpServletRequest request, HttpServletResponse response) {
        //post method limit
        if (!request.getMethod().equals("POST")) {
            throw new AuthenticationServiceException(
                    "Authentication method not supported: " + request.getMethod());
        }

        UsernamePasswordAuthenticationToken authRequest = getAuthRequest(request);

        setDetails(request, authRequest); // 设置认证信息的细节,默认实现是IP及JSESSIONID

        return this.getAuthenticationManager()
                .authenticate(authRequest);   // 认证处理并放回结果
    }
}

    private UsernamePasswordAuthenticationToken getAuthRequest(HttpServletRequest request) {

        String username = obtainUsername(request);
        String password = obtainPassword(request);

        String verificationCode = obtainVCode(request); // 获取额外参数的方法,如验证码


        checkParams(username, password); // 可以有简单参数校验的过程

        LoginRequest authenticationRequest = new LoginRequest(username, password, verificationCode); // 构造认证请求参数实体

        return new UsernamePasswordAuthenticationToken(
        authenticationRequest, "");
}
在获取额外的参数和校验操作后,需要处理登录参数,即验证登录行为,为此需要提供一个AuthenticationProvider接口的实现类,复写其authenticate方法,代码具体如下所示:
public class CustomAuthenticationProvider
        implements AuthenticationProvider {

    private final UserService userService;

    private final LoginControlService loginControlService;

    @Override
    public Authentication authenticate(Authentication authentication) {
        // 验证是否有登录状态
        if ((authentication instanceof UsernamePasswordAuthenticationToken) && authentication.isAuthenticated()) {
            return authentication;
        }

        // 验证是否可获取到参数参数
        if (!(authentication.getPrincipal() instanceof LoginRequest)) {
            log.error("unexpected request model");
            throw new KdAuthenticationException("Internal Server Error");
        }

        // 获取登录参数及辅助验证信息(IP、JSESSIONID等)
        LoginRequest loginRequest = (LoginRequest) authentication.getPrincipal();
        WebAuthenticationDetails details = (WebAuthenticationDetails) authentication.getDetails();

        // 验证过程
        User user = userService.login(loginRequest, details.getRemoteAddress());

        // 返回验证成功后且带有用户信息的验证token,UserDetail实现UserDetails接口的自定义用户信息实体
        return new UsernamePasswordAuthenticationToken(new UserDetail(user.getId(), user.getName()), null, Collections.emptyList());
    }

    @Override
    public boolean supports(Class<?> authentication) {
        return authentication.equals(
                UsernamePasswordAuthenticationToken.class);
    }
}
记住登录
记住登录的需求十分地常见,避免了用户频繁地输入用户名密码登录,除了配置参数实现记住登录外,spring security也提供了自定义记住登录的实现机制,下面简单介绍一下实现方式。
首先,我们需要创建一个RememberMeServices的实现类,如下:
public class RememberMeService implements RememberMeServices {

    private final Userservie userService;


    public RemeberMeService(Userservice userService) {
        this.userService = userService;
    }

    @Override
    public Authentication autoLogin(HttpServletRequest request, HttpServletResponse response) {

        // 获取用于验证记住登录的cookie
        String rememberMeCookie = extractRememberMeCookie(request);

        // 校验cookie的合法性
        if (rememberMeCookie == null) {
            return null;
        }

        if (rememberMeCookie.length() == 0) {
            log.info("cookie is empty");
            cancelCookie(response);
            return null;
        }

        try {
            // 通过记住登录cookie指登录,其中包括了一些登录信息的校验和用户信息的查询
            User user = userService.loginByRememberMeToken(rememberMeCookie);
            // 返回验证成功后且带有用户信息的验证token
            return new UsernamePasswordAuthenticationToken(new UserDetail(user.getId(), user.getUsername()), null, Collections.emptyList());
        } catch (Exception e) {
            log.error("auto login with login token fail");
            return null;
        }
    }

    // 删除非法的cookie
    private void cancelCookie(HttpServletResponse response) {
        log.info("Cancelling cookie");
        // remove cookie handle
        ...
    }

    // 获取记住登录cookie
    private String extractRememberMeCookie(HttpServletRequest request) {
        ...
    }

    // 在用户登录失败后rememberMeService需要执行的操作,此处为删除记住登录的cookie
    @Override
    public void loginFail(HttpServletRequest request, HttpServletResponse response) {
        log.debug("Interactive login attempt was unsuccessful.");
        cancelCookie(response);
    }

    // 在用户登录成功后rememberMeService需要执行的操作,此处为添加记住登录cookie
    @Override
    public void loginSuccess(HttpServletRequest request, HttpServletResponse response, Authentication successfulAuthentication) {
        boolean isRememberLogin = obtainRememberMe(request);
        if (isRememberLogin) {
            // add and save remember me token
            ...
        }
    }

    private boolean obtainRememberMe(HttpServletRequest request) {
        String rememberMe = request.getParameter("rememberMe");
        return Boolean.valueOf(rememberMe);
    }
}
最后将实现的RememberMeService加入到过滤器及验证处理中,且执行顺序应该在用户名密码方式验证登录的过滤器之前,如下:
public class SecurityConfig extends WebSecurityConfigurerAdapter {

    @Override
    protected void configure(HttpSecurity http) throws Exception {
        http.addFilterBefore(authenticationFilter(), UsernamePasswordAuthenticationFilter.class)
            .addFilterBefore(rememberMeAuthenticationFilter(), AuthenticationFilter.class)
                .csrf().disable()
                ...
    }

    // 构建RememberMeAuthenticationFilter
    private RememberMeAuthenticationFilter rememberMeAuthenticationFilter() throws Exception {
        return new RememberMeAuthenticationFilter(authenticationManagerBean(), this.rememberMeService);
    }

    /**
     * 自定义登录验证过滤器
     */
    private AuthenticationFilter authenticationFilter() throws Exception {
        AuthenticationFilter filter = new AuthenticationFilter();
        filter.setAuthenticationManager(authenticationManagerBean());
        filter.setRememberMeServices(this.rememberMeService);  // 执行rememberMeService定义的登录成功和失败的回调
        return filter;
    }
}
登出处理
同样地,既然能登录那么登出功能也是必要的,我们可以用自带的登出来配置执行的操作,配置如下:
public class SecurityConfig extends WebSecurityConfigurerAdapter {

    @Override
    protected void configure(HttpSecurity http) throws Exception {
        http.requestMatchers()
            .and().logout()
            .logoutSuccessHandler(logoutSuccessHandler())
            .clearAuthentication(true).deleteCookies(REMEMBER_LOGIN_COOKIE_KEY);  //清除登录状态并删除记住登录cookie
    }

    /**
     * 自定义登出成功响应
     *
     * @return logout success handler
     */
    private LogoutSuccessHandler logoutSuccessHandler() {
        return (request, response, authentication) -> response.setStatus(HttpStatus.NO_CONTENT.value());
    }
验证异常处理
当登录过程产生异常,我们有时候可能在接口上返回指定的响应,这时候可以通过自定义AuthenticationFailureHandler来实现,如下:
public class SecurityConfig extends WebSecurityConfigurerAdapter {

    ...

    private AuthenticationFailureHandler failureHandler() {
        return (request, response, e) -> {
            if (e instanceof CustomAuthenticationException) {
                CustomAuthenticationException exception = (CustomAuthenticationException) e;
                response.setStatus(exception.getStatusCode());
                response.setContentType(MediaType.APPLICATION_JSON_UTF8_VALUE);
                response.getWriter().append("your json error response");
            } else {
                response.setStatus(INTERNAL_SERVER_ERROR.value());
                response.setContentType(MediaType.APPLICATION_JSON_UTF8_VALUE);
                response.getWriter().append("non custom AuthenticationException response");
            }
        };
    }
}
添加到处理验证的过滤器中,如下:
public class SecurityConfig extends WebSecurityConfigurerAdapter {

    ...

    /**
    * 自定义登录验证过滤器
    */
    private AuthenticationFilter authenticationFilter() throws Exception {
        AuthenticationFilter filter = new AuthenticationFilter();
        filter.setAuthenticationManager(authenticationManagerBean());
        filter.setAuthenticationFailureHandler(failureHandler()); // 添加验证失败处理器
        return filter;
    }
}
需要注意的是该处理器只能处理AuthenticationException接口的实现异常,故处理过程中的自定义异常应该实现该接口,另外过滤器中抛出的异常是不会到加了@RestControllerAdvice的全局异常处理器处理的。
认证客户端配置
一些客户端的功能配置及某些坑的处理。
登录后获取用户信息
登录成功后,在其他的接口可能会需要用到登录状态中存储的用户信息,可以按如下所示从session获取到:
public User (HttpServletRequest request) {
    session = request.getSession();
    SecurityContextImpl securityContext = (SecurityContextImpl) session.getAttribute("SPRING_SECURITY_CONTEXT");
    if (securityContext != null) {
        OAuth2Authentication authentication = (OAuth2Authentication) securityContext.getAuthentication();
        UsernamePasswordAuthenticationToken authenticationToken = (UsernamePasswordAuthenticationToken) authentication.getUserAuthentication();
        Object userInfoDetail = authenticationToken.getDetails();
        LinkedHashMap userInfoMap = (LinkedHashMap) userInfoDetail;
        return user = new UserDto((String) userInfoMap.get("id"),(String) userInfoMap.get("username"),(String) userInfoMap.get("telephone"));
    } else {
        return null;
    }
}
登出重定向
客户端登出,不仅要擦出本应用的登录状态,还需要重定向到认证服务器的登出接口上,假如没有此操作,则之后再重定向到认证服务器时该用户又会自动登录。
public class UserController {

    /**
     * 用户登出
     *
     * @return 操作成功通用返回
     */
    @GetMapping(value = "/logout")
    public void logout(HttpServletRequest request, HttpServletResponse response) throws IOException {
        new SecurityContextLogoutHandler().logout(request, null, null);
        response.sendRedirect("http://your.auth-server.domain:8080/logout");
    }
}
认证服务器异常循环重定向的坑
在实际操作中发现访问登录受限接口时,假如认证服务器认证过程报错的话,客户端会登录失败且又会重定向到认证服务器的登录授权接口。假如认证服务器宕机的话或服务暂时不可用的话会导致异常访问的堆积,增加了服务器的压力,最终导致认证服务器彻底崩溃。故客户端需要在向认证服务器登录授权失败时要有自己的异常处理。解决方法为添加一个自定义的过滤器,具体如下:
@EnableOAuth2Sso
@Configuration
public class ClientSecurityConfig extends WebSecurityConfigurerAdapter {

    private final ApplicationContext applicationContext;

    public ClientSecurityConfig(ApplicationContext applicationContext) {
        this.applicationContext = applicationContext;
    }

    @Override
    public void configure(HttpSecurity http) throws Exception {
        http.addFilterAfter(oAuth2ClientAuthenticationProcessingFilter(),
                AbstractPreAuthenticatedProcessingFilter.class);
        http.antMatcher("/**")
                .authorizeRequests()
                .antMatchers("/login", "/user/logout")
                .permitAll()
                .anyRequest()
                .authenticated();
    }

    private OAuth2ClientAuthenticationProcessingFilter oAuth2ClientAuthenticationProcessingFilter() {
        OAuth2RestOperations restTemplate = this.applicationContext
                .getBean(UserInfoRestTemplateFactory.class).getUserInfoRestTemplate();
        ResourceServerTokenServices tokenServices = this.applicationContext
                .getBean(ResourceServerTokenServices.class);
        OAuth2ClientAuthenticationProcessingFilter filter = new OAuth2ClientAuthenticationProcessingFilter(
                "/login");
        filter.setRestTemplate(restTemplate);
        filter.setTokenServices(tokenServices);
        filter.setApplicationEventPublisher(this.applicationContext);
        filter.setAuthenticationFailureHandler(failureHandler());
        return filter;
    }

    private AuthenticationFailureHandler failureHandler() {
        return (request, response, e) -> {
            response.setStatus(INTERNAL_SERVER_ERROR.OK.value());
            response.setContentType(MediaType.APPLICATION_JSON_UTF8_VALUE);
            response.getWriter().append("error json response");
        };
    }
}
总结
在多应用的系统中,SSO可以使各业务应用不用过于关注登录登出等授权的业务逻辑,可以专注于自身的业务逻辑,登录逻辑一旦需要变化,只需要升级授权服务器的代码即可,便于系统整体的升级更新。另外,用户一次登录便可以在多个应用间免密静默登录,优化了用户体验。